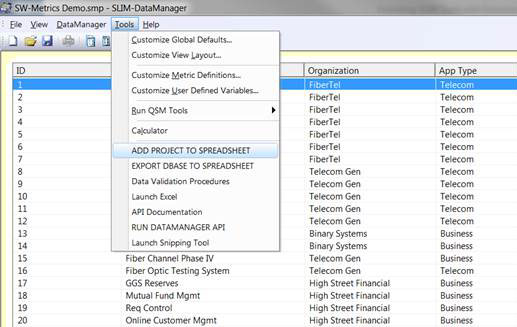
Extension menu items are one of the best new features in SLIM-Suite 8.2. You don’t have to be a programmer (or even pretend to be one online) to create customizable menu items that perform tasks like these right from the menu of any SLIM-Suite application:
- Call external applications like Excel, Word, or PowerPoint
- Run SLIM-Suite utilities or APIs
- Open external references or process guides
- Launch the Windows Snipping Tool to capture screen settings or data and email them to your team.
Once you get the hang of it, creating your own custom menu items is easy: if you can unzip files and use Notepad, trust me – you can do this!
The Extension Menu Item feature is documented in its own chapter in each SLIM-Suite user guide, but if you’re like me you could probably use a few real life examples and some sample configuration settings to jump start the process. In a fairly short period of time, I was easily able to create the following menu items in SLIM-DataManager:
- IMPORT PROJECT FROM SPREADSHEET
- EXPORT DATABASE TO SPREADSHEET
- RUN DATAMANAGER API
- Bring up the API documentation
- Bring up an internal data validation guide
- Launch Excel, Word, PowerPoint and OneNote
- Launch the Windows Snipping tool.
The menu items I created fell into several categories: launching an external application, launching a SLIM-Suite utility/API, pointing to an external process guide, launching a Windows utility. I’ll cover each one, providing sample configuration text for each.
CREATING THE .INI FILE
The first thing you’ll need is a text editor like Notepad. You’re going to create a simple text file with a .ini file extension to hold the configuration settings for the menu items you want to have available in SLIM. First, create a text file and save it to your Tools82 program folder (if you accepted the default location during setup, this will be C:\Program Files (x86)\QSM\Tools82). Use this naming convention:
SLIM-<insert specific tool name here>CustomMenu.ini
Since I was extending SLIM-DataManager, my filename was SLIM-DataManagerCustomMenu.ini. If I wanted to create custom menu items for SLIM-Estimate, I would call the file SLIM-EstimateCustomMenu.ini. When saving the file for the first time, make sure you change the “Save As Type” setting in the Save dialog to “All Files (*.*) so you can assign it an .ini file extension.
CREATING A SIMPLE MENU ITEM
Our first menu item will simply launch an Office application with a blank (new) file. Once you’ve mastered the basic format, you can vary it to call other applications or perform more complex tasks. To create the menu item, open the .ini file you just created. Here are the basic elements you’ll need to enter:
- Section name = [Excel]
- Menu item text = Launch Excel
- Path to application executable = C:\Program Files (x86)\Microsoft Office\Office14\excel.exe
Here’s how the configuration text should look in your .ini file:
[Excel]
Name=Launch Excel
Application=C:\Program Files (x86)\Microsoft Office\Office14\excel.exe
Save the .ini file. Next, open any SLIM-DataManager 8.2 workbook and go to the Tools menu. Your new custom menu item(s) should show up beneath the Calculator menu item:

LAUNCHING AN APPLICATION AND OPENING A FILE
Now that you know how to launch an external application with a blank file, let’s add a twist: this time, we want to open a specific document on my computer (the API Documentation) using Microsoft Word. Note, I had previously downloaded this document and saved it to my machine.
The first part of this menu item looks just like our previous example except this time we’re launching Word instead of Excel. The section name is [API Documentation], the menu item text is API Documentation, the path points to the MS Word application executable on your machine (C:\Program Files (x86)\Microsoft Office\Office14\WINWORD.EXE). But this time, we’d like to open an existing file (SLIM-DataManagerAPI82.docx) without having to remember exactly where the file is located. To do this, we’ll add a Parameter to tell the custom menu item where it can find the file we want:
[API Documentation]
Name=API Documentation
Application=C:\Program Files (x86)\Microsoft Office\Office14\WINWORD.EXE
Parameters="C:\Users\kate\Documents\QSM\Tools82\UTILITIES\QSMAPI82\SLIM-DataManagerAPI82.docx"
LAUNCHING A SLIM-SUITE UTILITY OR API
For our next magical trick, let’s create a custom menu item to call the SLIM-DataManager API. Note – before this menu item will work, you’ll have to download a copy of the API you want to use from our Downloads page and get it working on your machine. Because this menu item is so similar to the previous one, I’ll skip the explanation and go right to the configuration text:
[DataMgrAPI]
Name=RUN DATAMANAGER API
Application=C:\Program Files (x86)\Microsoft Office\Office14\excel.exe
Parameters="C:\Users\kate\Documents\QSM\Tools82\UTILITIES\QSMAPI82\DMApiDemo82.xlsm"
LAUNCHING THE WINDOW SNIPPING TOOL
This one was a bit tricky, as I had to locate the executable (Snipping Tool.exe) and copy it to a folder on my machine rather than just launching it from the Windows system32 folder. Here’s the configuration text:
[Snipping Tool]
Name=Launch Snipping Tool
Application=C:\Users\kate\Documents\QSM\Tools82\UTILITIES\SnippingTool.exe
That’s all there is to it! Remember: the extension menu item configuration process is covered in detail in your SLIM-Suite online help and in the PDF user guides. If you have questions or would like a demonstration, email QSM support and we’ll be happy to help!
